Tuesday, May 31, 2011

Study Ancient India by making Batik Cloths!

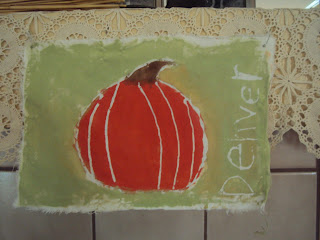
I can't take credit for this one....Here are the instructions for batik techniques for children.  But, here are some pictures of our versions.  We did this around the fall timeframe, so the kids chose to make their design fall-ish.

Haha....yeah, this kid hardly ever wears a shirt to "school".

Here, Denver is adding the paint to the "glue drawing" he has already added to the muslin cloth.  This muslin is left over from the mummy project from Egypt.   We used the blue gel glue that the above artist suggested. 
It worked out great.  Just make sure your glue is dry before you add the acrylic paint.


We used some of my scrapbooking acrylic paints.  You could use any brand, though.

This is what the back looks like when they are dry.  The paint doesn't adhere to where the glue design was drawn.

On Day Two, rinse off the dried glue with hot water (as hot as you can stand). 
The process takes a few minutes. 

This is Denver's pumpkin cloth.  I love it!

Here is Solomon's design!


You can complete this study by reading this book, Life in the Ancient Indus River Valley.  Check your local library. We did a notebooking page on what we learned.  I love the website http://www.notebookingpages.com/  Just go ahead and buy all of her pages.  They are beautiful, affordable and so practical for all ages. 


If your children are older elementary and up, you can watch the movie Gandhi with Ben Kingsley, a classic!  It is a little lengthy so it may be a good idea to break it up into two parts.  It actually has an intermission, so just stop there.  We also read some kid-friendly biographies on Mother Teresa and mapped the major rivers, oceans, mountain ranges and cities in India on black-line maps, purchased through Homeschool In The Woods

If you love adding culinary pursuits to your curriculum, what a perfect time to tackle vegetable samosas, chicken curry or Indian rice pudding. 

Great vocabulary words for India:  Buddhism, Hinduism, caste, pilgrimage, monsoon, Sanskrit, rickshaw, karma, reincarnation, yeti, Ganges River, Himalayan Mountains.

Buddha Stories by Demi is also recommended by TOG and we found it to be very entertaining.  They are basically short stories that teach a lesson--Aesop's Fables for its time and place, if you will. 

Have fun exploring the history, the animals, the culture and famous faces of India--then and now!

Ideas for an Egypt study using Tapestry of Grace

Let's take a journey to Ancient Egypt!  This unit was PHENOMENAL!

We did Egyptian Scale Drawings the first week.  Just take any Egyptian clip art (we used the inexpensive Dover coloring book on Ancient Egypt and also some free clip art on Google Images--just be sure to search under "line drawings" or else you'll get photographs and things that are hard for the kids to copy).  Take a ruler and draw lines equal widths and heights apart so that you create your own graph paper on a blank sheet.  Then, using the same dimensions, draw these grids OVER the printed clip art.  Make sure your image is enlarged enough, so that the kids are able to see clearly what's inside each square.  Then, show them how the Egyptians were able to carve and paint such large-scale drawings on monuments and tombs using this technique. 

Help them get started by showing them how to copy what's in each square and then how to connect the surrounding squares.  It's a great history lesson, but also a good workshop in the concept of "scale".  Here are some drawings the boys did.....


Another project suggested by TOG is Egyptian Reed Boats.  It is featured in the book "Make it Work!  Egypt", which you can probably find in your local library.  We used some dried grass that we found at the city ball field.  It was just growing wild.  You need something that will be firm (not green) but also a little bit bend-y for when you pull the ends up and tie them.  The kids made several small bundles, then they tied them together into one big bundle.  The ends are then roped to the body of the boat, creating an upturned effect.  You can use small dowel rods for the oars and balsa wood pieces (we had some scraps of leather) to make the paddles. 
This book is suggested for the "Grammar" levels, but I wanted to keep it for the middle-school years.  It has some great projects that we just didn't get to.  That's the beauty of TOG-- we'll be back here in 4 more years!


Now, for their favorite project in Egypt.....Mummifying Barbies!

We've seen instructions on mummifying chickens and other "once-living" creatures, but wanted something we could keep until the grandparents were able to visit.  Something that wouldn't rot and fill the house with the odor of chicken carcass. We found a Barbie and a G.I. Joe at the local Goodwill and gave them a most educational transformation!


Use inexpensive muslin and rip it into strips.  If it's too difficult to rip, simply cut it.
Then brew some strong black tea (3 or 4 teabags) and let the strips sit in the tea for a good while.

Remove muslin strips from tea and let them dry for several hours or overnight.


Say goodbye to the dearly departed.  They will never look like this again.

Remove their clothes and try not to look.

We used foil to give them more of a solid form.  You don't have to deal with protruding arms and legs in the wrapping process.

Start wrapping and tucking the strips.  If they don't stay put, use a little transparent tape.

Voila!  A mummy! 


Looking back, we could have taken this to the next level by adding kosher salt (to represent natron) and some cinnamon to represent the spices they used in mummification.  You can even get fancy and fashion a sarcophagus for your mummy!  There are so many neat ideas for Egypt--go crazy!


The Patriarchs--an original film by the Smith Brothers!

We spent several weeks learning the Bible stories of Abraham, Isaac, Jacob and Joseph.  The boys love toying around with their amateur film-making ideas, so they made stick puppets for an original film entitled, "The Patriarchs!".  I firmly believe this project cemented these Bible stories in their little brains forever.  They had me narrate while they played all the parts, made the scenery, edited the film (we used Microsoft Movie Maker) and did the casting (our guinea pigs play the parts of Esau and the camel).  Check it out!


Mesopotamia

Just a word of advice: Don't buy the natural colored hard blocks of modeling clay!  They are very difficult to work with when trying to do pottery with younger children.  My boys are 9 and 11 and were very frustrated with trying to make the clay pliable enough to create anything.  They made some rough versions of what they REALLY wanted to make and begged me not to buy that clay again.  In fact, I returned several unopened boxes of it to Michael's and bought the "good stuff"--Model Magic by Crayola!  This is soft and very moldable and is condusive to paint, markers, etc.  I love the way you can add just a dot of color from a marker and then "knead" it into the rest of the clay to create a soft color.  It can be baked or not and doesn't dry out as easy as Play-Doh or other mediums.  In hindsight, I think our Mesopotamian pottery project would have gone smoother with Model Magic.
Kids Discover saves the day once again!  I love their great titles, including this one.

Learn Backgammon together!  It has its origins in Mesopotamia!

What he's really saying with this smile is, "Mom, don't ever buy this clay again."  LOL.

The finished products for their unit celebration.  A little cuneiform tablet and a functional pot.  Good job, guys!

Projects for Creation Studies

This was our first unit for Year One in Tapestry of Grace.  My children are both considered "Upper Gramar Level" according to their grade-levels (3rd and 5th), so your children may have different reading lists.  However, all ages study the same topics at the same time.  The literature selections for this unit were really beautiful.  "The True Story of Noah's Ark" by Tom Dooley was a wonderfully-crafted selection, read by the author on the included audio CD, complete with sound effects and music.  It really started our year off right.  You can view the book here.  After we read this, we went outside and, in the middle of the street, started seeing for ourselves how large Noah's Ark really was, based on the measurements in the Bible.  Of course, we had to do some clever conversions from cubits to feet. This link will help you with the math.  Since most tape measures only go so far, the kids had to do even more math to get the right measurements!  If your kids have always pictured Noah's Ark being a cute little boat with smiling cartoon animals hanging off the sides, wait until you see this book and do this project!  Wow!

Backtracking a bit....when you study about the days of Creation, a fun ways for the kids to memorize what happened on each day is to make a flip book.  We used 11x17 paper.  In fact, buy a whole pack of this paper at the beginning of the year, as it comes in handy for making foldable projects of all kinds, especially vocabulary.  Anyway, take 4 of these sheets and stagger them about 1 inch from the one behind it like so:

Then flip it over and fold it so the other tabs line up making an eight-tabbed book. 


The large "cover-tab" will be for the title and student name.  The others can be labeled Day 1, Day 2 and so forth.  Don't forget to leave a tiny bit of room to punch a few holes.  You can weave yarn, ribbon or twine through the holes to bind the book together.  The kids got creative and illustrated the insides with cotton ball clouds, rhinestone stars and octopus stickers. 

Monday, May 30, 2011

Shifting Directions

Some of you have been following my other blog, Scones and Roses.  This is when my children were enrolled in school and I was "playing around" at home with baking, gardening, decorating and other signs of a Kept Woman.  LOL.  Last year, we made the decision to homeschool our two sons, ages 11 and 9 and my life has taken quite a different path.  I will still continue to occasionally write for my other "pretty blog", but my focus at this time is on our Amazing Homeschooling Journey.  It is as much my own pilgrimage as it is the kids'.  We are learning so much together and I feel, finally, that I am completing the education I never had.

There were many factors that went into our initial decision to homeschool.  Boredom at school, never being able to relay to us at home what they had learned that week, getting notes home about behavior (when upon further investigation, were revealed to be ridiculous), but most of all, it was the "mother's intuition" that something just wasn't right.  That something very important, something that was a large fraction of their childhood, their LEARNING, was being cheapened, watered-down and quite frankly, not valued.  Once we took the leap to un-enroll them from public school and started to embark on the roller coaster of curriculum choices, teaching styles, classroom setups and support groups, it was a ride we were ready to take!

We have centered our weeks around the Tapestry of Grace curriculum.  This, for those of you not familiar, is a 4-year classical curriculum based in history, but also including Bible History, Vocabulary, Writing, Government, Fine Arts, Philosophy and Literature.  It is extremely thorough and sometimes very challenging, but is meant to be a "buffet".  Well, I can say with certainty that we OVER-ATE this year.  We did alot of projects, models, lapbooks, etc. and the kids will tell you that they loved it!  However, I'm not sure that I can duplicate that whirlwind of a year for them this year.  Going forward, I am hoping that we can slow down and not feel tied to the 36 week schedule.  If something needs more time, I'd love for us to park there and enjoy it.

I will not attempt to recount everything that we've done this first year.  I have created posts for some of our Greatest Hits of 2010-2011, which were centered around Ancient Civilizations (Mesopotamia, Egypt, China, India, MesoAmerica, Persia, Greece and Rome) as well as Charlotte-Mason style Artist Study, a year in Apologia's Flying Creatures curriculum, and lots of other great projects.

I hope you'll visit with me often and share what you are doing in your homeschool classroom.....

Blessings,
Kimberly